Code Your Own Website
Intro to HTML + CSS
Class 2
Anatomy of a Website
Your Content
+ HTML: Structure
+ CSS: Presentation
= Your Website
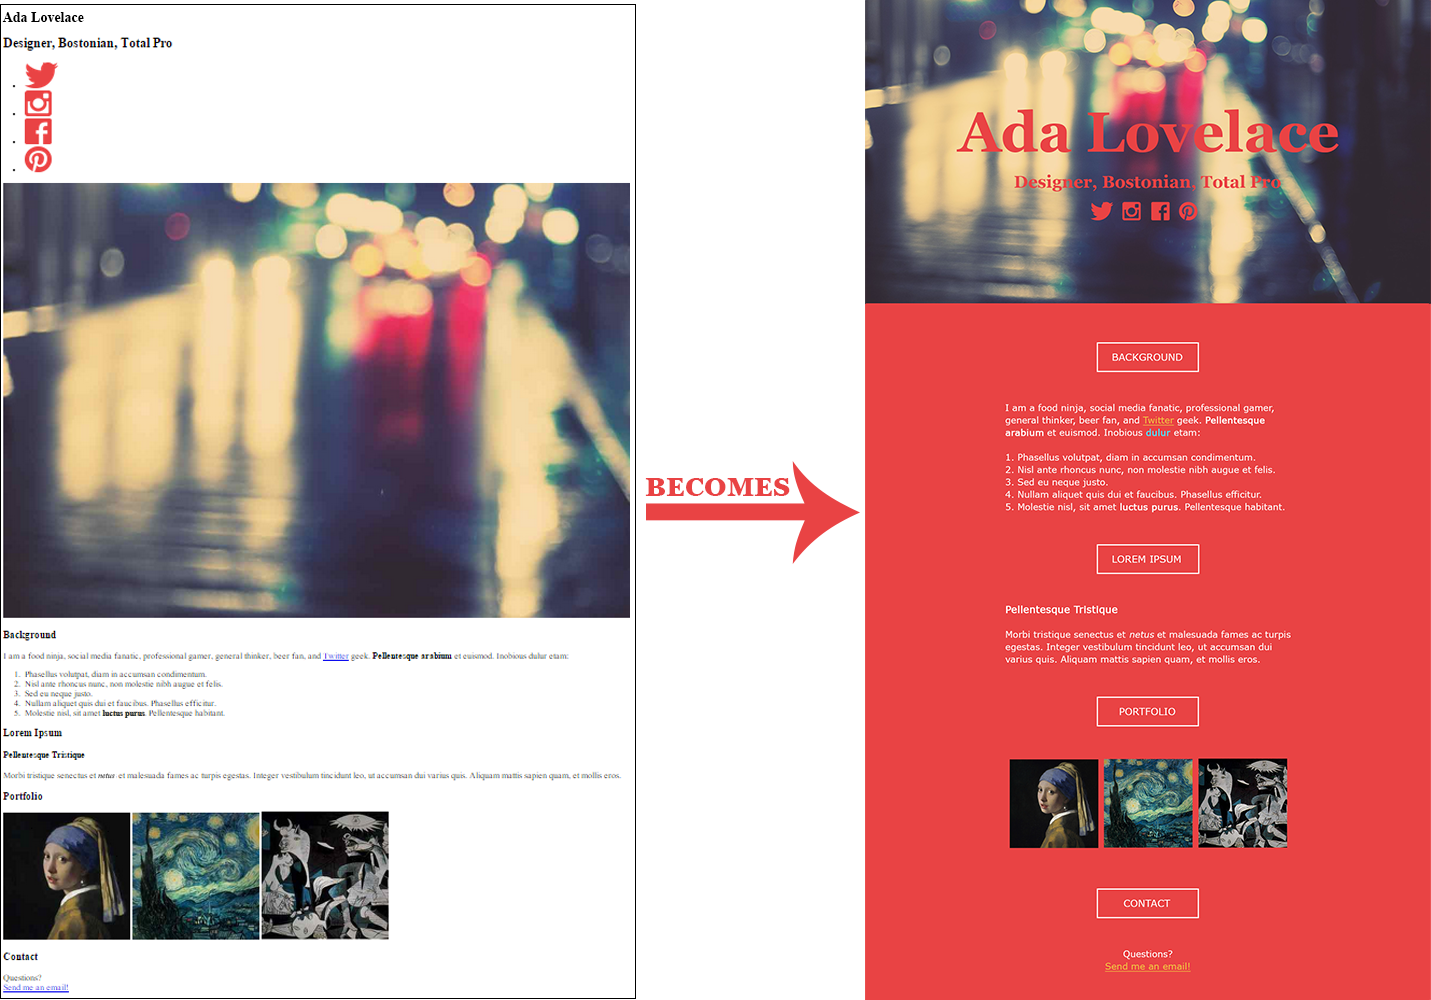
A website is a way to present your content to the world, using HTML to structure that content, and CSS to make it look good.
CSS: What can it do?
All colored text, positioning, sizes
CSS: What is it?
- CSS stands for Cascading Style Sheets
- CSS describes how HTML elements are to be displayed when:
- on a screen
- on devices (tablets, phones, etc.)
- on printed paper
CSS: What is it?
CSS in Action
HTML + CSS
- HTML structures the content:
<p>This paragraph should have red text.</p> - Since CSS is a different language, it is kept in a different file (.css instead of .html). CSS says how your structured content should look:
p { color: red; } - On your Website, the result is:
This paragraph should have red text.
Without CSS, your HTML pages would look boring ☺
How does it work?
- You make an HTML file
- You make a CSS file that describes how specific HTML elements should look
- Within the <head></head> of your HTML file, you link to your CSS file
- The CSS searches through and selects specific elements that you've said should be styled, and applies that styling
CSS Syntax
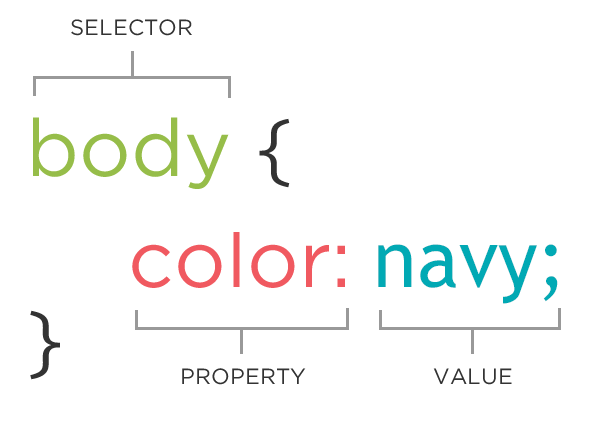
selector {
   property: values;
}
- A block of CSS code is a rule
- The rule starts with a selector
- It has sets of properties and values
CSS Syntax
You can add multiple property-value pairs to a rule, each ending with a semicolon:
body {
   color: lightblue;
   background-color: black;
   text-transform: uppercase;
}
CSS Coding Tip #1
Just like HTML, CSS ignores whitespace. All you need is for each rule to be in the correct format.
Best: ✔
p {
  font-size: 22px;
  text-align: center;
  color: red;
}
Decent:
p{font-size:22px;text-align:center;color:red;}
Not-so-great:
p {

          font-size:22px;
    text-align  :   center;
             color: red;


        }
The base format of a rule is selector{property:value;}
It doesn't matter where whitespace goes, as long as the format is correct
Connecting CSS to HTML
3 ways
- Inline
- Embedded
- External ✔
Connecting CSS to HTML
1. Inline
<p style="color:red;font-size:12px;">Some text.</p>- Not preferred ✗
- Uses the HTML attribute called style
- Difficult to use in large projects
Connecting CSS to HTML
2. Embedded
<head>
  <style type="text/css">
    p {
      color: red;
      font-size: 12px;
    }
  </style>
</head>- Not preferred ✗
- Inside head element
- Uses style tag
- Needs to be placed in each HTML file
Connecting CSS to HTML
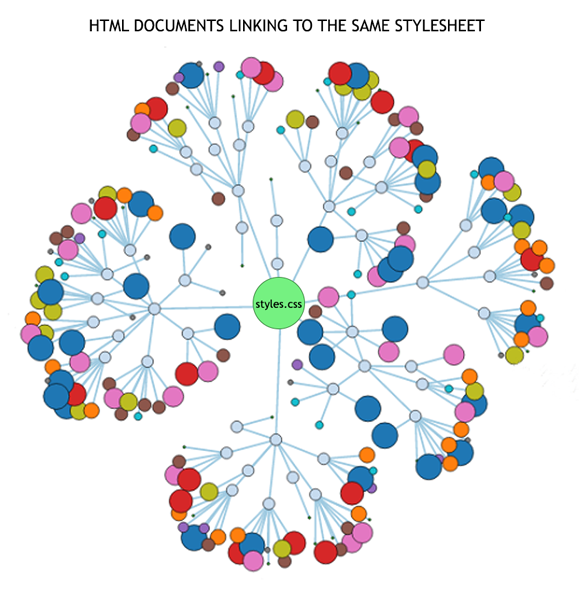
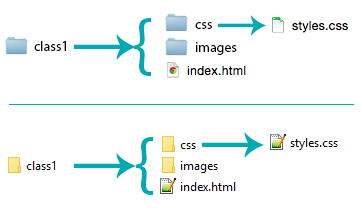
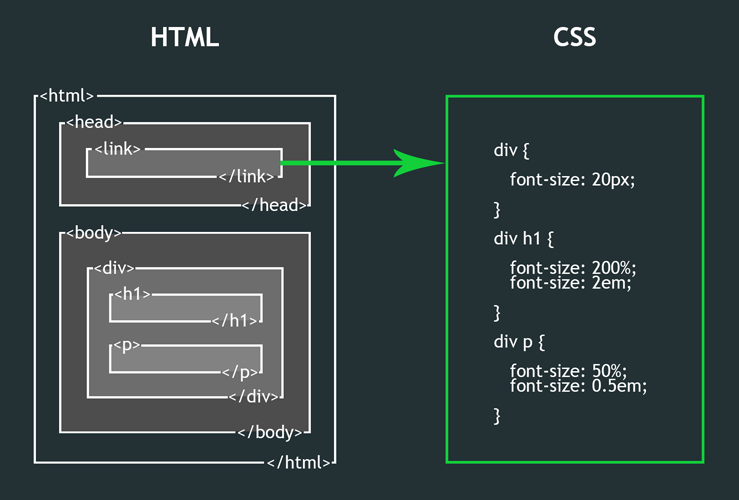
3. External
<head>
  <link rel="stylesheet" href="css/styles.css" />
</head>- Preferred by developers everywhere! ✔
- External CSS saves a lot of work by controlling the look and feel of multiple pages at once
- Easy to maintain
- Useful when working with a team
- Reduced bandwidth
- Easier for search engines to crawl your site's content
Connecting CSS to HTML
3. External
Selector: Element
Enter the element's tag name to target those elements:
p {
   color: aqua;
}
p { } in CSS corresponds to <p></p> in HTML
The following selects all image elements:
img {
   width: 600px;
}
img { } in CSS corresponds to <img /> in HTML
Property: color
The color property changes the color of the text.
p {
   color: red;
   color: #ff0000;
   color: rgb(255, 0, 0);
   color: rgba(255, 0, 0, 0.7);
}
Options:
- Color name (e.g. white)
- Hexadecimal value (e.g. #FFFFFF or #FFF)
- RGB value (e.g. rgb(255, 255, 255) )
- RGBA value for opacity (e.g. rgba(255, 255, 255, 0.5) )
There are 140 reserved color names, including: black, blue, aqua, fuchsia, grey, green, lime, maroon, navy, olive, purple, red, and teal
See a full list »
Property: background-color
The background-color property changes the color of the background
body {
   background-color: black;
   background-color: #000000;
   background-color: rgb(0, 0, 0);
   background-color: rgba(0, 0, 0, 0.7);
}
Selector: Descendant
To target elements that are descended from another element, use a selector for the ancestor, then a space, then a selector for the descendant:
HTML:
<div>
  Buy one get one
  <strong>free</strong>
  <p>
    Offer valid
    <strong>today</strong>
    only
  </p>
</div>
CSS:
div strong {
  background-color: yellow;
  color: blue;
}
Result:
Offer valid today only
Let's Develop It!
Let's get stylin'
- Apply a background color to your body element and/or other elements
- Apply text colors to elements (e.g. paragraph, heading, and list elements)
- Try to use the decendant selector to style descendants
Property: font-family
The font-family property defines which font is used
body {
   font-family: Helvetica;
   font-family: "Helvetica Neue";
   font-family: Arial;
   font-family: sans-serif;
}
If a font name is more than one word, it goes in quotation marks (like "Helvetica Neue").
Preferred ✔: Use a prioritized list. The page will load whichever font it recognizes first in the list:
body {
   font-family: Helvetica, "Helvetica Neue", Arial, sans-serif;
}
Helpful site: CSSFontStack.com »
Property: font-size
The font-size property specifies the size of the font.
p {
  font-size: 16px;
  font-size: 1em;
  font-size: 100%;
}
Options include:
- Pixels
- "em" Units
- Percentages
The default <body></body> size is 16px
Usually 16px = 1em = 100%
Property: font-size
px versus em versus %
Pixels are a fixed-size unit — they don't change relative to their ancestor's font size. Percentages and "em"s are scalable and relative to their ancestor's font size.
Properties:
font-style and font-weight
The font-style property sets italic styling for text
The font-weight property sets text boldness
h4 {
  font-style: normal;
  font-style: italic;
  font-style: oblique;

  font-weight: normal;
  font-weight: bold;
}
Property: font-variant
Use font-variant to make small-caps text
h1 {
  font-variant: normal;
  font-variant: small-caps;
}
An Example of 'small-caps' Text
Property: line-height
The line-height property specifies text line height
p {
  font-size: 10px;
  line-height: 20px;
  line-height: 2em;
  line-height: 2;
}
Property: text-transform
Use text-transform to make text lowercase, capitalized, or uppercase
h1 {
  text-transform: lowercase;
  text-transform: capitalize;
  text-transform: uppercase;
}
an Example of 'lowercase' Text
an Example of 'capitalize' Text
an Example of 'uppercase' Text
Property: text-align
The text-align property aligns text to the left, right, or center
p {
  text-align: left;
  text-align: right;
  text-align: center;
}
Let's Develop It!
Let's style some text elements with:
- Font family
- Font sizes
- Font boldness and italicization
- Text capitalization
- Line heights
- Text alignment
More selectors, you say?
Selector: Class
Enter a period (.)
followed directly by the class attribute's value
to target all elements with that class:
HTML:
<p class="warning">Lorem ipsum</p>
<span class="warning">Dolor sit amet</p>
CSS:
  .warning {
   color: red;
  }
Result:
Lorem ipsum
Dolor sit amet
.red { } in CSS corresponds to <tagname class="red"></tagname> in HTML
Selector: Class
Using Multiple Classes
Assign multiple classes to an element by separating each class with a space in the HTML:
HTML:
<p class="green bordered">Cowabunga!</p>
<p class="green">said Michaelangelo</p>
CSS:
.green {
    color: green;
}

.bordered {
    border-width: 3px;
    border-style: dashed;
    border-color: fuchsia;
}
Result:
Cowabunga!
said Michaelangelo
Since the first <p></p> element is targeted by both the .green and .bordered CSS rules, it is both green and bordered.
Selector: ID
To target elements with a specific ID, use the hashtag (#), followed by the ID attribute's value:
HTML:
<div id="featured">
  <a href="result1.html">
    The One Featured Search Result's Title
  </a>
  <p>
    A description of this search result
  </p>
</div>
CSS:
  #featured {
   background-color: #F5E17F;
  }
Selector: ID
You can assign multiple classes to an element, but ...
ID should only apply to one element on the page
Why? IDs are unique
IDs vs. Classes
A Practical Example
Selector: Descendant
Using Classes or IDs
The descendant and ancestor selectors don't have to be tag names; they can be classes, IDs, etc.
HTML:
<ul id="intro">
  <li>
    We are an
    <span class="fancy-text">amazing</span>
    team of developers
  </li>
  <li>
    Located in
    <span class="fancy-text">beautiful</span>
    Cambridge, MA
  </li>
</ul>
CSS:
#intro .fancy-text {
  background-color: yellow;
  color: blue;
  font-style: italic;
}
Result:
- We are an amazing team of developers
- Located in beautiful Cambridge, MA
Selector: Elements with a Specific Class
To select an element with a specific class and tag name, use the tag name, followed by a period (.), then the class attribute's value:
HTML:
<p class="red">Lorem ipsum</p>
<span class="red">Dolor sit amet</span>
CSS:
span.red {
  color: red;
}
Result:
Lorem ipsum
Dolor sit amet
Make sure there are no spaces in between your tag name, period, and class!
Selector Order and Spacing
Why are these three rules so different?
.class div {
  color: red;
}

div .class {
  color: green;
}

div.class {
  color: orange;
}
Cascading
What does the cascading in Cascading Style Sheets mean?
Styles "cascade" down until changed
HTML:
<p>Paragraph 1</p>
<p class="red">Paragraph 2</p>
<p class="red" id="special">Paragraph 3</p>
CSS:
p{
  color: blue;
  font-family: Impact;
}
.red{
  color: red;
}
#special{
  font-family: Arial;
}
Result:
Paragraph 1
Paragraph 2
Paragraph 3
Let's Develop It!
- In your HTML, add classes and IDs to elements
- In your CSS, use selectors to style the following:
- Elements with the same class
- An element with an ID
- Elements with a specific tag and class
- Descendants of an element
- Descendants of a class or ID